JavaScript of Halftone Printing
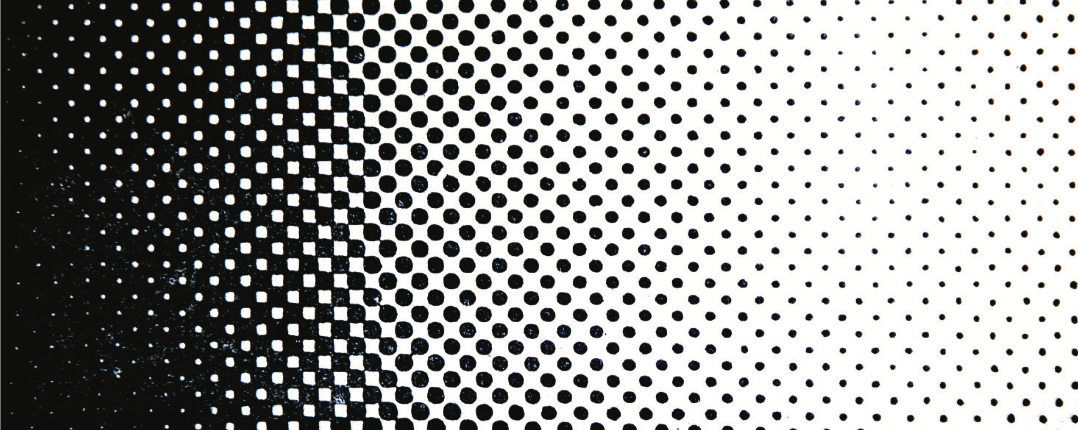
Halftone printing is a technique for printing continuous value using dots of solid color with varying size or spacing.
Halftones were invented in the 19th century as a way to accurately reproduce photographs in print. Ink can only print one value (black or white), but halftones introduce the illusion of continous value with the size and spacing of dots.

Additionally, by printing different colors of ink through layered halftones, it’s possible to create the illusion of the color of the original image.
This article is meant to be illustrative, not a one-to-one replica of the printing process. I’m embracing the artifacts that happen as a result of trying to imitate it. The images generated here may appear differently based on the device you’re using.
Generating Halftones
Traditionally, halftone screens were made by exposing high-contrast film through a mesh screen, which would create dots on the film. Here, we’re going to imitate this process by drawing circles on an HTML5 canvas.
We’ll begin by generating a halftone from a grayscale gradient. Areas of the gradient which are darker will result in larger dots in our halftone, and areas of the gradient which are lighter will result in smaller dots.
const domTarget = document.currentScript.parentElement;
const attach = (node) => {
  document.currentScript.parentElement.appendChild(node);
};
const resize = (canvas, width, height) => {
  canvas.width = width;
  canvas.height = height;
  canvas.style.width = `${width}px`;
  canvas.style.height = `${height}px`;
};

const createCanvas = (width, height) => {
  const canvas = document.createElement("canvas");
  resize(canvas, width, height);
  return canvas;
};

const WIDTH = 200,
  HEIGHT = 200;

const sourceCanvas = createCanvas(WIDTH, HEIGHT);
attach(sourceCanvas);
const sourceCtx = sourceCanvas.getContext("2d");

const gradient = sourceCtx.createLinearGradient(
  0,
  HEIGHT / 2,
  WIDTH,
  HEIGHT / 2
);
gradient.addColorStop(0, "black");
gradient.addColorStop(1, "white");

sourceCtx.fillStyle = gradient;
sourceCtx.fillRect(0, 0, WIDTH, HEIGHT);
To generate the halftone, we’ll sample the source canvas’s color data at a regular interval and draw a dot (with context.arc()) sized based on the value of the gradient at that point. The value is extracted from the 2d rendering context’s ImageData, which is organized as a flat array of [R, G, B, A, R, G, B, A, ...].
const targetCanvas = createCanvas(WIDTH, HEIGHT);
attach(targetCanvas);
const targetCtx = targetCanvas.getContext("2d");

let PIXELS_PER_DOT = 10;
const sourceImageData = sourceCtx.getImageData(0, 0, WIDTH, HEIGHT);

const positionToDataIndex = (x, y, width) => {
  width = width || WIDTH;
  // data is arranged as [R, G, B, A, R, G, B, A, ...]
  return (y * width + x) * 4;
};

// re-maps a value from its original range [minA, maxA] to the range [minB, maxB]
const map = (value, minA, maxA, minB, maxB) => {
  return ((value - minA) / (maxA - minA)) * (maxB - minB) + minB;
};

for (let y = 0; y < HEIGHT; y += PIXELS_PER_DOT) {
  for (let x = 0; x < WIDTH; x += PIXELS_PER_DOT) {
    const index = positionToDataIndex(x, y);
    // extract the R, G, B from the source image.
    // because it's grayscale, only the red channel needs to be sampled.
    const value = sourceImageData.data[index];
    const circleRadius = map(value, 0, 255, PIXELS_PER_DOT / 2, 0);
    targetCtx.beginPath();
    targetCtx.arc(x, y, circleRadius, 0, Math.PI * 2);
    targetCtx.closePath();
    targetCtx.fill();
  }
}
The size of the circle in the half tone corresponds to the source image’s value, which is some number between 0 and 255. In a grayscale image, the red, green, and blue channels will all have the same value, so the pixel’s value can just be taken from imageData.data[index + 0], which is the red channel of the pixel.
Even when printing a color image the halftones are generated from grayscale, so we’ll be able to use this same trick later on.
Let’s look at what happens when the angle of the screen changes. To change the screen angle, the code conceptually rotates the entire screen around its center to find the positions of the dots that will need to be drawn. Because a screen of the same size as the image wouldn’t cover the entire image when rotated, the boundaries for iteration are expanded to cover the full region covered by the screen.
const rotationCanvas = createCanvas(WIDTH, HEIGHT);
attach(rotationCanvas);
const rotationCtx = rotationCanvas.getContext("2d");

const rotatePointAboutPosition = ([x, y], [rotX, rotY], angle) => {
  return [
    (x - rotX) * Math.cos(angle) - (y - rotY) * Math.sin(angle) + rotX,
    (x - rotX) * Math.sin(angle) + (y - rotY) * Math.cos(angle) + rotY,
  ];
};

const halftone = ({
  angle,
  dotSize,
  dotResolution,
  targetCtx,
  sourceCtx,
  width,
  height,
  color,
  layer,
}) => {
  const sourceImageData = sourceCtx.getImageData(0, 0, width, height);
  angle = (angle * Math.PI) / 180;
  targetCtx.fillStyle = "white";
  layer || targetCtx.fillRect(0, 0, width, height);
  targetCtx.fillStyle = color || "black";
  // get the four corners of the screen
  const tl = [0, 0];
  const tr = [width, 0];
  const br = [width, height];
  const bl = [0, height];
  // rotate the screen, then find the minimum and maximum of the values.
  const boundaries = [tl, br, tr, bl].map(([x, y]) => {
    return rotatePointAboutPosition([x, y], [width / 2, height / 2], angle);
  });
  const minX = Math.min(...boundaries.map((point) => point[0])) | 0;
  const minY = Math.min(...boundaries.map((point) => point[1])) | 0;
  const maxY = Math.max(...boundaries.map((point) => point[1])) | 0;
  const maxX = Math.max(...boundaries.map((point) => point[0])) | 0;

  for (let y = minY; y < maxY; y += dotResolution) {
    for (let x = minX; x < maxX; x += dotResolution) {
      let [rotatedX, rotatedY] = rotatePointAboutPosition(
        [x, y],
        [width / 2, height / 2],
        -angle
      );

      if (
        rotatedX < 0 ||
        rotatedY < 0 ||
        rotatedX > width ||
        rotatedY > height
      ) {
        continue;
      }
      const index = positionToDataIndex(
        Math.floor(rotatedX),
        Math.floor(rotatedY),
        width
      );
      // we're always operating on grayscale images, so just grab the value from
      // the red channel.
      const value = sourceImageData.data[index];
      const alpha = sourceImageData.data[index + 3];
      if (alpha) {
        const circleRadius = map(value, 0, 255, dotSize / 2, 0);
        targetCtx.beginPath();
        targetCtx.arc(rotatedX, rotatedY, circleRadius, 0, Math.PI * 2);
        targetCtx.closePath();
        targetCtx.fill();
      }
    }
  }
};

const createSlider = (min, max, value, labelTextFn) => {
  const slider = document.createElement("input");
  slider.min = min;
  slider.max = max;
  slider.value = value;
  slider.type = "range";
  const label = document.createElement("label");
  label.innerHTML = labelTextFn(value);
  slider.addEventListener("input", () => {
    label.innerHTML = labelTextFn(slider.value);
  });
  return [slider, label];
};

(() => {
  halftone({
    angle: 0,
    dotSize: PIXELS_PER_DOT,
    dotResolution: PIXELS_PER_DOT,
    targetCtx: rotationCtx,
    sourceCtx: sourceCtx,
    width: WIDTH,
    height: HEIGHT,
  });

  const [angleSlider, angleSliderLabel] = createSlider(
    0,
    89,
    0,
    (v) => `${v} degrees`
  );
  attach(angleSliderLabel);
  attach(angleSlider);
  angleSlider.addEventListener("input", (e) => {
    const deg = parseInt(angleSlider.value, 10);
    halftone({
      angle: deg,
      dotSize: PIXELS_PER_DOT,
      dotResolution: PIXELS_PER_DOT,
      targetCtx: rotationCtx,
      sourceCtx: sourceCtx,
      width: WIDTH,
      height: HEIGHT,
    });
  });
})();
We’ll see later how important the angle of the screens can be when printing multiple layers.
We can also change the maximum size of dots and the resolution of dots. When we approach 1 pixel per dot, the optical illusion of the halftone begins to become more convincing.
const dotsizeCanvas = document.createElement("canvas");
dotsizeCanvas.width = WIDTH;
dotsizeCanvas.height = HEIGHT;
dotsizeCanvas.style.width = `${WIDTH}px`;
dotsizeCanvas.style.height = `${HEIGHT}px`;
attach(dotsizeCanvas);
const dotsizeCtx = dotsizeCanvas.getContext("2d");

(() => {
  const [dotsizeSlider, dotsizeLabel] = createSlider(
    1,
    20,
    PIXELS_PER_DOT,
    (v) => `${v} pixels per dot`
  );
  attach(dotsizeLabel);
  attach(dotsizeSlider);

  const [resolutionSlider, resolutionSliderLabel] = createSlider(
    1,
    10,
    5,
    (v) => `${v} pixels between dots`
  );
  attach(resolutionSliderLabel);
  attach(resolutionSlider);

  const redraw = () => {
    const dotsize = parseInt(dotsizeSlider.value, 10);
    const resolution = parseInt(resolutionSlider.value, 10);
    halftone({
      angle: 0,
      dotSize: dotsize,
      dotResolution: resolution,
      targetCtx: dotsizeCtx,
      sourceCtx: sourceCtx,
      width: WIDTH,
      height: HEIGHT,
    });
  };

  dotsizeSlider.addEventListener("input", () => {
    redraw();
  });
  resolutionSlider.addEventListener("input", () => {
    redraw();
  });

  redraw();
})();
This is the halftone function we’ll use throughout the rest of this article. It takes an:
angleto rotate the halftone screen by,dotSizewhich determines the radius of a dot,dotResolutionwhich is the space between dots,targetCtxonto which it will draw,sourceCtxfrom which it will extract value (it assumes it is grayscale),widthandheightof the source and target, andcolorit will use for dots.layerdetermines whether the target context should be cleared before drawing.
The halftone function iterates over a 2-dimensional grid of positions where it would like to put a dot. When making a dot, it samples the source context’s image data, converts the value from a range of 0-255 to a radius, and draws a circle at that position in the target context.
Layering Halftones
Because the only way to print a darker value is putting more ink through a larger dot, darker areas of a printed image suffer from over-saturation and ink bleed. In order to maintain high detail in dark areas, multiple layers are printed using different color inks, called a “duotone.”
The dark areas of the image are still printed using black ink, but at a finer resolution to avoid over-saturation. A second layer is printed using a lighter ink, so when the two layers are superimposed, the dark areas appear dark while maintaining detail.
Let’s create a duotone of this still life by Goya.
const container = document.currentScript.parentElement;
const stillLifeCanvas = createCanvas(1, 1);
attach(stillLifeCanvas);

const stillLifeCtx = stillLifeCanvas.getContext("2d");
const stillLife = new Image();

let STILL_LIFE_WIDTH, STILL_LIFE_HEIGHT;

const stillLifeReady = new Promise((resolve) => {
  stillLife.src = "/projects/halftone/stilllife.jpeg";
  stillLife.onload = () => {
    const aspectRatio = stillLife.height / stillLife.width;
    stillLife.width = Math.min(stillLife.width, window.screen.width - 50);
    stillLife.height = stillLife.width * aspectRatio;

    STILL_LIFE_WIDTH = stillLife.width;
    STILL_LIFE_HEIGHT = stillLife.height;
    resize(stillLifeCanvas, STILL_LIFE_WIDTH, STILL_LIFE_HEIGHT);
    stillLifeCtx.drawImage(stillLife, 0, 0, STILL_LIFE_WIDTH, STILL_LIFE_HEIGHT);
    resolve();
  };
});
First, let’s look at the result of generating a halftone directly from this image. I’m using a resolution of 3 pixels between dots and a dot diameter of 5 pixels.
const stillLifeHalftoneCanvas = createCanvas(1, 1);
attach(stillLifeHalftoneCanvas);

stillLifeReady.then(() => {
  resize(stillLifeHalftoneCanvas, STILL_LIFE_WIDTH, STILL_LIFE_HEIGHT);
  const halftoneCtx = stillLifeHalftoneCanvas.getContext("2d");

  halftone({
    angle: 0,
    dotSize: 5,
    dotResolution: 3,
    targetCtx: halftoneCtx,
    sourceCtx: stillLifeCtx,
    width: STILL_LIFE_WIDTH,
    height: STILL_LIFE_HEIGHT,
    color: "black",
  });
});
The area around the grapes (?) is very dark, and we lose some of the detail of the image because of how densely the dots are packed. The bottles in the background also disappear, because the dot size is oversaturated. Let’s try to solve this using a duotone.
First, the image is split into two separate layers. The first layer contains all values, and will be printed first in a light color. The second layer contains primarily the darkest colors, and will be printed second in black. The exact distribution of value between the layers is usually controlled with a duotone curve, but in our case I’ll just split on values darker than 127.
const stillLifeLayerOne = createCanvas(1, 1);
attach(stillLifeLayerOne);
const stillLifeLayerOneCtx = stillLifeLayerOne.getContext("2d");

const stillLifeLayerTwo = createCanvas(1, 1);
attach(stillLifeLayerTwo);
const stillLifeLayerTwoCtx = stillLifeLayerTwo.getContext("2d");

stillLifeReady.then(() => {
  resize(stillLifeLayerOne, STILL_LIFE_WIDTH, STILL_LIFE_HEIGHT);
  resize(stillLifeLayerTwo, STILL_LIFE_WIDTH, STILL_LIFE_HEIGHT);

  const duotoneThreshold = 127;
  const stillLifeImageData = stillLifeCtx.getImageData(
    0,
    0,
    STILL_LIFE_WIDTH,
    STILL_LIFE_HEIGHT
  );
  const layerOneImageData = stillLifeLayerOneCtx.getImageData(
    0,
    0,
    STILL_LIFE_WIDTH,
    STILL_LIFE_HEIGHT
  );
  const layerTwoImageData = stillLifeLayerTwoCtx.getImageData(
    0,
    0,
    STILL_LIFE_WIDTH,
    STILL_LIFE_HEIGHT
  );
  // separate the image so that values darker than 100
  // are only in layer one
  for (let y = 0; y < STILL_LIFE_HEIGHT; y++) {
    for (let x = 0; x < STILL_LIFE_WIDTH; x++) {
      const index = positionToDataIndex(x, y, STILL_LIFE_WIDTH);
      const [r, g, b, a] = [
        stillLifeImageData.data[index + 0],
        stillLifeImageData.data[index + 1],
        stillLifeImageData.data[index + 2],
        stillLifeImageData.data[index + 3],
      ];
      const value = (r + g + b) / 3;
      if (value < duotoneThreshold) {
        const adjustedValue = map(value, 0, duotoneThreshold, 0, 255);
        layerTwoImageData.data[index + 0] = adjustedValue;
        layerTwoImageData.data[index + 1] = adjustedValue;
        layerTwoImageData.data[index + 2] = adjustedValue;
        layerTwoImageData.data[index + 3] = 255;
      }
      layerOneImageData.data[index + 0] = value;
      layerOneImageData.data[index + 1] = value;
      layerOneImageData.data[index + 2] = value;
      layerOneImageData.data[index + 3] = 255;
    }
  }
  stillLifeLayerOneCtx.putImageData(layerOneImageData, 0, 0);
  stillLifeLayerTwoCtx.putImageData(layerTwoImageData, 0, 0);
});
Next, we’ll generate halftones from these two grayscale images and stack these two halftones on top of eachother, printing brown first, then our shadows second in black.
const duotone = createCanvas(1, 1);
attach(duotone);
const duotoneCtx = duotone.getContext("2d");

const [duotoneAngleSlider, duotoneAngleSliderLabel] = createSlider(
  0,
  89,
  45,
  (v) => `${v} degree offset`
);
attach(duotoneAngleSliderLabel);
attach(duotoneAngleSlider);

stillLifeReady.then(() => {
  resize(duotone, STILL_LIFE_WIDTH, STILL_LIFE_HEIGHT);
  duotoneCtx.globalAlpha = 0.8;

  const drawDuotone = () => {
    halftone({
      angle: duotoneAngleSlider.value,
      dotSize: 5,
      dotResolution: 3,
      targetCtx: duotoneCtx,
      sourceCtx: stillLifeLayerOneCtx,
      width: STILL_LIFE_WIDTH,
      height: STILL_LIFE_HEIGHT,
      color: "brown",
      layer: true,
    });
    halftone({
      angle: 0,
      dotSize: 5,
      dotResolution: 3,
      targetCtx: duotoneCtx,
      sourceCtx: stillLifeLayerTwoCtx,
      width: STILL_LIFE_WIDTH,
      height: STILL_LIFE_HEIGHT,
      color: "black",
      layer: true,
    });
  };
  duotoneAngleSlider.addEventListener("input", () => {
    duotoneCtx.clearRect(0, 0, STILL_LIFE_WIDTH, STILL_LIFE_HEIGHT);
    drawDuotone();
  });
  drawDuotone();
});
When the two screens are offset, the two layers overlap and form a dark value without making the dots too large. You can see the outlines of the bottles against the dark background and the contour of the pears.
Early duotones were produced from photographs, but ink color was chosen manually in order to match the mood of the original. You can play with that here.
const customColorCanvas = createCanvas(1, 1);
attach(customColorCanvas);

const pickerOne = document.createElement("input");
pickerOne.type = "color";
pickerOne.value = "gray";
const pickerOneLabel = document.createElement("label");
pickerOneLabel.innerHTML = "Color one";
attach(pickerOneLabel);
attach(pickerOne);

const pickerTwo = document.createElement("input");
pickerTwo.type = "color";
pickerOne.value = "black";
const pickerTwoLabel = document.createElement("label");
pickerTwoLabel.innerHTML = "Color two";
attach(pickerTwoLabel);
attach(pickerTwo);

stillLifeReady.then(() => {
  resize(customColorCanvas, STILL_LIFE_WIDTH, STILL_LIFE_HEIGHT);
  const customColorCtx = customColorCanvas.getContext("2d");

  let colorOne = "gray";
  let colorTwo = "black";
  pickerOne.addEventListener("input", () => {
    colorOne = pickerOne.value;
    drawCustomDuotone();
  });
  pickerTwo.addEventListener("input", () => {
    colorTwo = pickerTwo.value;
    drawCustomDuotone();
  });

  const drawCustomDuotone = () => {
    halftone({
      angle: 0,
      dotSize: 5,
      dotResolution: 3,
      targetCtx: customColorCtx,
      sourceCtx: stillLifeLayerOneCtx,
      width: STILL_LIFE_WIDTH,
      height: STILL_LIFE_HEIGHT,
      color: colorOne,
    });
    halftone({
      angle: duotoneAngleSlider.value,
      dotSize: 5,
      dotResolution: 3,
      targetCtx: customColorCtx,
      sourceCtx: stillLifeLayerTwoCtx,
      width: STILL_LIFE_WIDTH,
      height: STILL_LIFE_HEIGHT,
      color: colorTwo,
      layer: true,
    });
  };
  drawCustomDuotone();

  duotoneAngleSlider.addEventListener("input", () => {
    drawCustomDuotone();
  });
});
When overlaying the two layers you may have noticed a distracting grid-like pattern. This is called a moiré, and we’re going to look at how to control it.
Moiré and Rosettes
When printing two halftones on top of one another, their grid patterns will align at intervals. Let’s look at an example of two large halftones, one red and one blue. Adjusting the angle between the halftones and you’ll notice patterns emerge and disappear. Particularly, note the pattern around 82º and 12º.
// create a hidden all-black context so that we can create a full-density halftone
const hiddenCanvas = createCanvas(200, 200);
const valueCtx = hiddenCanvas.getContext("2d");
valueCtx.fillStyle = "rgba(127, 127, 127)";
valueCtx.fillRect(0, 0, 200, 200);

const redBlueCanvas = createCanvas(200, 200);
attach(redBlueCanvas);

const [redBlueAngleSlider, redBlueAngleSliderLabel] = createSlider(
  0,
  90,
  45,
  (v) => `${v} degrees`
);
attach(redBlueAngleSliderLabel);
attach(redBlueAngleSlider);

(() => {
  const redBlueCtx = redBlueCanvas.getContext("2d");

  const redraw = () => {
    halftone({
      angle: 0,
      dotSize: 10,
      dotResolution: 10,
      targetCtx: redBlueCtx,
      sourceCtx: valueCtx,
      width: 200,
      height: 200,
      color: "red",
    });
    halftone({
      angle: redBlueAngleSlider.value,
      dotSize: 10,
      dotResolution: 10,
      targetCtx: redBlueCtx,
      sourceCtx: valueCtx,
      width: 200,
      height: 200,
      color: "blue",
      layer: true,
    });
  };

  redBlueAngleSlider.addEventListener("input", () => {
    redBlueCtx.clearRect(0, 0, 200, 200);
    redBlueAngleSliderLabel.innerHTML = `${redBlueAngleSlider.value} degrees`;
    redraw();
  });
  redraw();
})();
In printed material, this grid can be distracting, and angles are chosen in order to eliminate it. Let’s look at eliminating the moiré with four layers: cyan, magenta, yellow, and black (commonly known as CMYK, where black is “key”).
const cmykComposite = createCanvas(200, 200);
const cmykAngles = createCanvas(200, 200);

attach(cmykComposite);
attach(cmykAngles);

const drawArrow = (ctx, angle, color, length) => {
  angle = (angle * Math.PI) / 180;
  ctx.save();
  ctx.strokeStyle = color;
  ctx.fillStyle = color;
  ctx.lineWidth = 3;
  ctx.translate(0, 200);
  ctx.beginPath();
  ctx.moveTo(0, 0);
  ctx.lineTo(Math.cos(angle) * length, -Math.sin(angle) * length);
  ctx.closePath();
  ctx.stroke();
  ctx.rotate(-angle);
  ctx.translate(length, 0);
  ctx.moveTo(10, 0);
  ctx.lineTo(0, 10);
  ctx.lineTo(0, -10);
  ctx.closePath();
  ctx.fill();
  ctx.restore();
};

(() => {
  const angles = {
    yellow: 0,
    cyan: 15,
    key: 45,
    magenta: 75,
  };
  const cmykCtx = cmykComposite.getContext("2d");
  const cmykAnglesCtx = cmykAngles.getContext("2d");

  const [cyanSlider, cyanLabel] = createSlider(
    1,
    90,
    angles.cyan,
    (v) => `Cyan: ${v}º`
  );
  const [magentaSlider, magentaLabel] = createSlider(
    1,
    90,
    angles.magenta,
    (v) => `Magenta: ${v}º`
  );
  const [yellowSlider, yellowLabel] = createSlider(
    1,
    90,
    angles.yellow,
    (v) => `Yellow: ${v}º`
  );
  const [keySlider, keyLabel] = createSlider(
    1,
    90,
    angles.key,
    (v) => `Key: ${v}º`
  );

  attach(cyanLabel);
  attach(cyanSlider);
  attach(magentaLabel);
  attach(magentaSlider);
  attach(yellowLabel);
  attach(yellowSlider);
  attach(keyLabel);
  attach(keySlider);

  const redraw = () => {
    drawArrows();
    drawComposite();
  };

  const drawArrows = () => {
    cmykAnglesCtx.clearRect(0, 0, 200, 200);
    drawArrow(cmykAnglesCtx, angles.cyan, "cyan", 150);
    drawArrow(cmykAnglesCtx, angles.magenta, "magenta", 150);
    drawArrow(cmykAnglesCtx, angles.yellow, "yellow", 150);
    drawArrow(cmykAnglesCtx, angles.key, "black", 150);
  };

  const drawComposite = () => {
    cmykCtx.globalAlpha = 0.75;
    halftone({
      angle: angles.yellow,
      dotSize: 10,
      dotResolution: 10,
      targetCtx: cmykCtx,
      sourceCtx: valueCtx,
      width: 400,
      height: 400,
      color: "yellow",
    });
    halftone({
      angle: angles.cyan,
      dotSize: 10,
      dotResolution: 10,
      targetCtx: cmykCtx,
      sourceCtx: valueCtx,
      width: 400,
      height: 400,
      color: "cyan",
      layer: true,
    });
    halftone({
      angle: angles.magenta,
      dotSize: 10,
      dotResolution: 10,
      targetCtx: cmykCtx,
      sourceCtx: valueCtx,
      width: 400,
      height: 400,
      color: "magenta",
      layer: true,
    });
    halftone({
      angle: angles.key,
      dotSize: 10,
      dotResolution: 10,
      targetCtx: cmykCtx,
      sourceCtx: valueCtx,
      width: 400,
      height: 400,
      color: "black",
      layer: true,
    });
  };

  cyanSlider.addEventListener("input", (e) => {
    angles.cyan = parseInt(cyanSlider.value, 10);
    redraw();
  });
  magentaSlider.addEventListener("input", (e) => {
    angles.magenta = parseInt(magentaSlider.value, 10);
    redraw();
  });
  yellowSlider.addEventListener("input", (e) => {
    angles.yellow = parseInt(yellowSlider.value, 10);
    redraw();
  });
  keySlider.addEventListener("input", (e) => {
    angles.key = parseInt(keySlider.value, 10);
    redraw();
  });

  redraw();
})();
There is no single “best” set of angles, but the angles are designed to maximize the distance between cyan, magenta and key. Because yellow is least visible, it can be comfortably aligned with cyan or magenta without producing visible moiré.
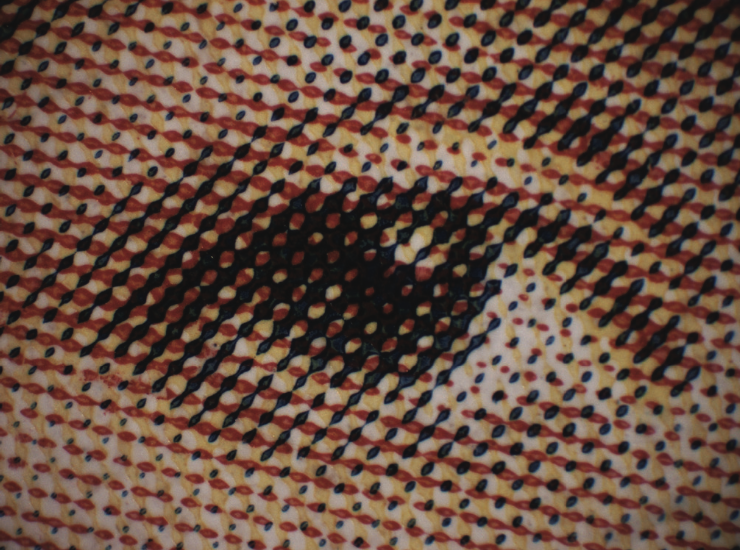
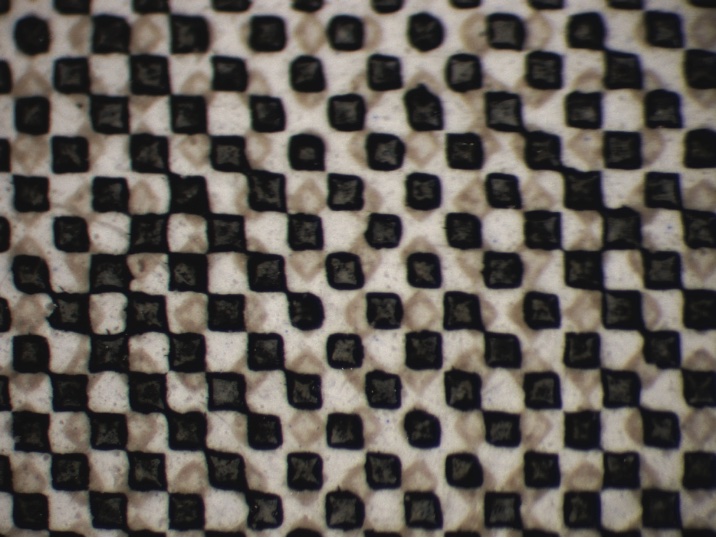
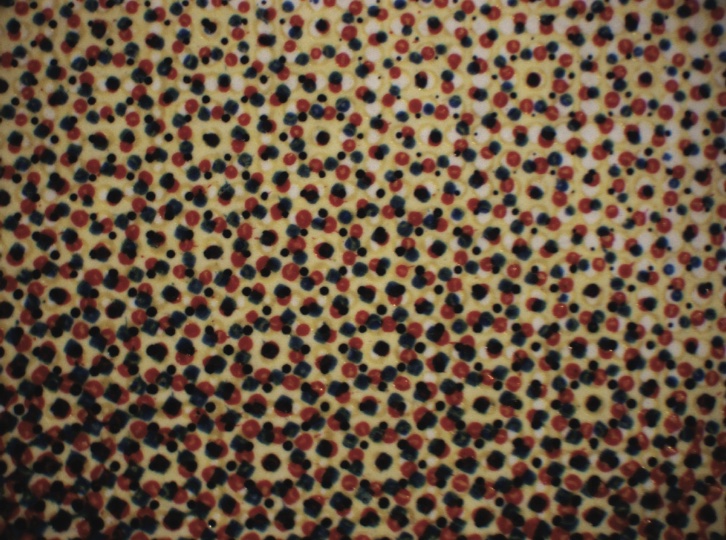
The most desirable alignments produces a specific moiré called a “rosette.” Rosettes are the smallest moiré, and occur at a high frequency in printed material, which makes them difficult to see at distance. There are a few different sets of angles which produce rosettes with different characteristics. Look closely at printed material and you can find them.
Converting an Image to CMYK
CMYK is a “subtractive” color model, compared with additive color models like LCD screens. Cyan, magenta, and yellow act as filters that absorb color from the printing substrate. Cyan is the complement of red, so the presence of cyan prevents red light from being reflected back to the viewer.
To calculate the corresponding CMY values for an RGB color, then, we can just take the complement of each channel (255 - value). Cyan is the complement of red, magenta is the complement of green, and blue is the complement of yellow.
Here’s a canvas with an RGB gradient (ignore the gray that gets generated when doing RGB interpolation) and the three individual CMY half tones created from it, then those three composited.
I extract each to a grayscale in-memory canvas first, which may seem unnecessarily complex, but it’s in keeping with the practical way these halftones would be generated. Halftone generation is concerned only with value, not color, so I convert the color to grayscale then create a halftone from that grayscale.
const rgbGradientCanvas = createCanvas(200, 100);
attach(rgbGradientCanvas);
const rgbGradientCtx = rgbGradientCanvas.getContext("2d");
const cmykGradientComposite = createCanvas(200, 100);
const cmykGradientCompositeCtx = cmykGradientComposite.getContext("2d");
cmykGradientCompositeCtx.globalCompositeOperation = "darken";

(() => {
  const cyanCanvas = createCanvas(200, 100);
  const cyanCtx = cyanCanvas.getContext("2d");
  cyanCtx.fillStyle = "cyan";
  attach(cyanCanvas);
  const magentaCanvas = createCanvas(200, 100);
  const magentaCtx = magentaCanvas.getContext("2d");
  magentaCtx.fillStyle = "magenta";
  attach(magentaCanvas);
  const yellowCanvas = createCanvas(200, 100);
  const yellowCtx = yellowCanvas.getContext("2d");
  yellowCtx.fillStyle = "yellow";
  attach(yellowCanvas);
  attach(cmykGradientComposite);

  const gradient = rgbGradientCtx.createLinearGradient(0, 50, 200, 50);
  gradient.addColorStop(0, "red");
  gradient.addColorStop(0.5, "green");
  gradient.addColorStop(1, "blue");
  rgbGradientCtx.fillStyle = gradient;
  rgbGradientCtx.fillRect(0, 0, 200, 100);
  const rgbGradientData = rgbGradientCtx.getImageData(0, 0, 200, 100);

  const inMemoryCanvas = createCanvas(200, 100);

  [cyanCtx, magentaCtx, yellowCtx].forEach((ctx, i) => {
    const grayscaleCtx = inMemoryCanvas.getContext("2d");
    const grayscaleImageData = grayscaleCtx.getImageData(
      0,
      0,
      inMemoryCanvas.width,
      inMemoryCanvas.height
    );
    for (let y = 0; y < rgbGradientCanvas.height; y++) {
      for (let x = 0; x < rgbGradientCanvas.width; x++) {
        const index = positionToDataIndex(x, y, rgbGradientCanvas.width);
        const complement = 255 - rgbGradientData.data[index + i];
        grayscaleImageData.data[index + 0] = 255 - complement;
        grayscaleImageData.data[index + 1] = 255 - complement;
        grayscaleImageData.data[index + 2] = 255 - complement;
        grayscaleImageData.data[index + 3] = 255;
      }
    }
    grayscaleCtx.putImageData(grayscaleImageData, 0, 0);
    halftone({
      angle: 0,
      dotSize: 3,
      dotResolution: 3,
      targetCtx: ctx,
      sourceCtx: grayscaleCtx,
      width: rgbGradientCanvas.width,
      height: rgbGradientCanvas.height,
      color: ctx.fillStyle,
    });
    halftone({
      angle: i * 33,
      dotSize: 2,
      dotResolution: 3,
      targetCtx: cmykGradientCompositeCtx,
      sourceCtx: grayscaleCtx,
      width: rgbGradientCanvas.width,
      height: rgbGradientCanvas.height,
      color: ctx.fillStyle,
      layer: true,
    });
  });
})();
The only bit that’s left is extracting the key, which is done by extracting the darkest value of the color. That key value is subtracted from each of the CMY colors.
For example, given the pixel (126, 18, 20), the key is equal to 255 - max(126, 18, 20) which is (255 - 126) == 129.
Then, the cyan channel is equal to (255 - R - K) == (255 - 126 - 129),
the magenta channel is equal to (255 - G - K) == (255 - 126 - 18), and
the yellow channel is equal to (255 - B - K) == (255 - 126 - 20).
There’s one last thing that needs to happen, which is complementing this value. We’re creating a grayscale image to generate our halftone from, and because dark values produce dots, we’ll want to finally take the complement of this value. For example, with our cyan channel of (255 - 126 - 129) == 0, we should end up with no dot in the resulting cyan halftone. A white value will produce no dot, so subtracting our value from white ((255, 255, 255)) will give us that result. This math can be simplified, but keeping it longform makes conceptual sense to me.
Modifying the Global Composite Operation
The HTML5 canvas has a globalCompositeOperation property which dictates how anything being drawn to the canvas should interact with what’s already there.
In order to simulate the behavior of ink on paper, we can set globalCompositeOperation = "darken"; which preserves the darkest (closest to zero) pixel values. For example, adding yellow (255, 255, 0) and magenta (255, 0, 255) will produce 255, 0, 0. This is how we’d expect magenta and yellow to interact in printing: yellow masks all blue light, magenta masks all green light, and we’re left with just red.
const compositeCanvas = createCanvas(300, 300);
const compositeContext = compositeCanvas.getContext("2d");
compositeContext.globalCompositeOperation = "darken";
attach(compositeCanvas);

(() => {
  const inMemoryCanvas = createCanvas(300, 300);
  const inMemoryContext = inMemoryCanvas.getContext("2d");
  inMemoryContext.fillStyle = "black";
  inMemoryContext.fillRect(0, 0, 300, 300);
  halftone({
    angle: 0,
    dotSize: 6,
    dotResolution: 8,
    targetCtx: compositeContext,
    sourceCtx: inMemoryContext,
    width: compositeCanvas.width,
    height: compositeCanvas.height,
    color: "yellow",
    layer: true,
  });
  halftone({
    angle: 75,
    dotSize: 6,
    dotResolution: 8,
    targetCtx: compositeContext,
    sourceCtx: inMemoryContext,
    width: compositeCanvas.width,
    height: compositeCanvas.height,
    color: "magenta",
    layer: true,
  });
})();
This globalCompositeOperation causes drawing to slow down quite a bit, so I’m using it only when mixing colors.
Birds
This example allows all parameters to be configured. I’ve manually chosen halftone angles that I think “look good,” which is of course my right as the “printer.”
const birdImage = new Image();
birdImage.src = "/projects/halftone/birds.jpg";
const birdCanvas = createCanvas(1, 1);
const birdContext = birdCanvas.getContext("2d");
attach(birdCanvas);

const compositeBirdCanvas = createCanvas(1, 1);
attach(compositeBirdCanvas);
const compositeBirdContext = compositeBirdCanvas.getContext("2d");

const target = document.currentScript.parentElement;

const birdReady = new Promise((resolve) => {
  birdImage.onload = () => {
    const aspectRatio = birdImage.height / birdImage.width;
    birdImage.width = Math.min(birdImage.width, window.screen.width - 50);
    birdImage.height = birdImage.width * aspectRatio;

    resize(birdCanvas, birdImage.width, birdImage.height);
    birdContext.drawImage(birdImage, 0, 0, birdImage.width, birdImage.height);
    resolve();
  };
});

const drawButton = document.createElement("button");
drawButton.innerHTML = "Halftone these birds";
drawButton.addEventListener("click", () => {
  drawButton.remove();
  birdReady.then(() => {
    resize(compositeBirdCanvas, birdImage.width, birdImage.height);
    halftoneBird();
  });
});
target.appendChild(drawButton);

const birdAngles = {
  yellow: 2,
  cyan: 15,
  key: 45,
  magenta: 75,
};

const [birdAngleCyanSlider, birdAngleCyanSliderLabel] = createSlider(
  0,
  90,
  birdAngles.cyan,
  (v) => `Cyan: ${v}º`
);
birdAngleCyanSlider.addEventListener("input", () => {
  birdAngles.cyan = birdAngleCyanSlider.value;
  halftoneBird();
});
const [birdAngleYellowSlider, birdAngleYellowSliderLabel] = createSlider(
  0,
  90,
  birdAngles.yellow,
  (v) => `Yellow: ${v}º`
);
birdAngleYellowSlider.addEventListener("input", () => {
  birdAngles.yellow = birdAngleYellowSlider.value;
  halftoneBird();
});
const [birdAngleKeySlider, birdAngleKeySliderLabel] = createSlider(
  0,
  90,
  birdAngles.key,
  (v) => `Key: ${v}º`
);
birdAngleKeySlider.addEventListener("input", () => {
  birdAngles.key = birdAngleKeySlider.value;
  halftoneBird();
});
const [birdAngleMagentaSlider, birdAngleMagentaSliderLabel] = createSlider(
  0,
  90,
  birdAngles.magenta,
  (v) => `Magenta: ${v}º`
);
birdAngleMagentaSlider.addEventListener("input", () => {
  birdAngles.magenta = birdAngleMagentaSlider.value;
  halftoneBird();
});

attach(birdAngleCyanSliderLabel);
attach(birdAngleCyanSlider);
attach(birdAngleYellowSliderLabel);
attach(birdAngleYellowSlider);
attach(birdAngleMagentaSliderLabel);
attach(birdAngleMagentaSlider);
attach(birdAngleKeySliderLabel);
attach(birdAngleKeySlider);

const [birdDotSizeSlider, birdDotSizeSliderLabel] = createSlider(
  1,
  10,
  3,
  (v) => `${v} pixels per dot`
);
birdDotSizeSlider.addEventListener("input", () => {
  halftoneBird();
});
attach(birdDotSizeSliderLabel);
attach(birdDotSizeSlider);

const [birdResolutionSlider, birdResolutionSliderLabel] = createSlider(
  1,
  10,
  2,
  (v) => `${v} pixels between dots`
);
birdResolutionSlider.addEventListener("input", () => {
  halftoneBird();
});
attach(birdResolutionSliderLabel);
attach(birdResolutionSlider);

const halftoneBird = () => {
  const birdData = birdContext.getImageData(
    0,
    0,
    birdCanvas.width,
    birdCanvas.height
  );
  compositeBirdContext.fillStyle = "white";
  compositeBirdContext.globalCompositeOperation = "source-over";
  compositeBirdContext.fillRect(0, 0, birdCanvas.width, birdCanvas.height);
  compositeBirdContext.globalCompositeOperation = "darken";

  const inMemoryCanvas = createCanvas(birdCanvas.width, birdCanvas.height);
  const grayscaleCtx = inMemoryCanvas.getContext("2d");
  const grayscaleImageData = grayscaleCtx.getImageData(
    0,
    0,
    inMemoryCanvas.width,
    inMemoryCanvas.height
  );
  [
    { angle: birdAngles.yellow, color: "yellow", channel: 2 },
    {
      angle: birdAngles.magenta,
      color: "magenta",
      channel: 1,
    },
    { angle: birdAngles.cyan, color: "cyan", channel: 0 },
    { angle: birdAngles.key, color: "black", key: true },
  ].forEach(({ angle, color, channel, key }) => {
    for (let y = 0; y < birdCanvas.height; y++) {
      for (let x = 0; x < birdCanvas.width; x++) {
        const index = positionToDataIndex(x, y, birdCanvas.width);
        const [r, g, b, a] = [
          birdData.data[index + 0],
          birdData.data[index + 1],
          birdData.data[index + 2],
          birdData.data[index + 3],
        ];
        const keyValue = 255 - Math.max(r, g, b);
        if (key) {
          grayscaleImageData.data[index + 0] = 255 - keyValue;
          grayscaleImageData.data[index + 1] = 255 - keyValue;
          grayscaleImageData.data[index + 2] = 255 - keyValue;
          grayscaleImageData.data[index + 3] = 255;
        } else {
          const complement = 255 - birdData.data[index + channel];
          grayscaleImageData.data[index + 0] = 255 - (complement - keyValue);
          grayscaleImageData.data[index + 1] = 255 - (complement - keyValue);
          grayscaleImageData.data[index + 2] = 255 - (complement - keyValue);
          grayscaleImageData.data[index + 3] = 255;
        }
      }
    }
    grayscaleCtx.putImageData(grayscaleImageData, 0, 0);
    halftone({
      angle: angle,
      dotSize: parseInt(birdDotSizeSlider.value, 10),
      dotResolution: parseInt(birdResolutionSlider.value, 10),
      targetCtx: compositeBirdContext,
      sourceCtx: grayscaleCtx,
      width: birdCanvas.width,
      height: birdCanvas.height,
      color: color,
      layer: true,
    });
  });
};
Conclusion
I hope this was informative and interesting, even if it’s not entirely practical.
Halftone printing is still incredibly common, and you should now have the understanding to pick it apart. The next time you see cardboard packaging, look at the bottom and you’ll see the ink colors used to print. Take a close look at the packaging and you can find the rosettes.